The frame comes first
I knew when I bought my house that I couldn’t garden the way I wanted to until the infrastructure was complete – that was the most difficult part. I wanted to build supports for my plants that would be as permanent as possible, without costing a lot of money, and requiring a huge effort on my part.
Googling DIY Websites
There are a lot of websites out there showing you how to build stuff in your yard. None of them had exactly what I wanted, but I was able to gather a lot of info and ideas.
I knew I needed:
- Support posts at the ends of the raspberry and marionberry rows
- A grape arbor
- A bean trellis
Things I knew about posts:
- You can’t use pressure treated lumber in a garden, because of the chemicals leaching out of the wood into the soil
- Even Cedar or Redwood posts anchored in concrete rot after awhile – at some point they would need replaced, and who wants to dig up the concrete the post was anchored in?
- Metals posts would be more permanent, but just are not organic – not the vibe I wanted for the garden.
Then I had an Aha! Moment..
It all came about when I was trying to figure out how to hide the old metal posts from the chain link fence I had taken down that separated the front yard from the back yard. I found by arranging cedar 2x4’s around the post, and screwing them together with decking screws, I could cover the post and it would fit better in my garden. Two posts I used to anchor one of my raised beds; the other post I was going to use as part of my grape arbor, but it just wasn’t in the right place, so now it is just there, and I will use it for holding a hanging planter or something.
First two fence posts covered
I realized as I was covering those posts that I could do the same thing for the support posts and grape arbor. So I had my son-in-law use the post hold digger and dig me some 24-30” holes. I then put in a bit of gravel, put in a 6’ fence post ( the skinny ones), poured in some dry cement mix, poured in the water, and as it was setting up, I used a post level to make sure it was straight in all directions. I let the concrete set up 24 hours, then clad the posts with cedar 2x4’s. Yeah, support posts!
I put some short pieces of 2x4 on the posts by the berries and put eye hooks in the ends – these hold the hardware that allows me to tighten the wire supports.
End of first row of berries
One of the raspberry support posts is home to my mason bees, who have hatched out now and are busy pollinating everything blooming.
Mason Bee home
I wanted to cover the tops of the posts before winter set in but didn’t get around to it. If you live somewhere where it freezes a lot in the winter, you need to cover the top. Otherwise water can build up in the pipe and freeze and expand. My plan for the posts is to put solar powered landscape lights on top. I can only afford one a month, so will be adding them slowly. But you could put birdhouses, (cute, but I don’t really want to attract birds to the berries, so won’t be doing that), or whirligigs. Or just cap them off with a cedar fence post top. The 5x5 cedar post tops are just a little big, but I figure I can shim them out, put some sealant in the cap, and then put some cedar trim around the edges if I want them to look less rustic.
I strung wire and put in hardware to tighten the wire for the grapes also.
I probably spent about the same amount on the 2x4’s and metal fence post that I would have on a cedar 4 x 4 – but where I will save money is later on – when the wood starts to deteriorate and I have to replace them. I will just unscrew the 2x4, slap in a new one, screw it in, and I am good to go. I don’t have to dig up the old concrete footing or deal with any of that mess.
The grape arbor before ( when I bought the house)
Side view
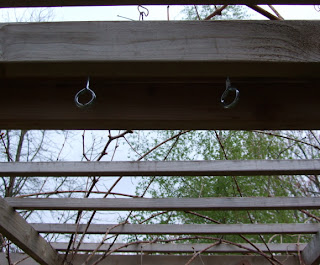
Top View ( with two eye bolts for my granddaughters swing)
Support detail
Completed Arbor
Misc SupportsI also needed support for cucumbers and tall peas, so attached a 2 x 4 frame to a raised bed, and used a poly trellis to stabilize it. Probably should add some corner supports like I did for the bean house, and if it ever stops raining this spring, I will!
Pea Supports
Summer 2010 - cucumbers
More on how I supported the beans later – It has been raining so much here that I haven’t had a chance to go out with the camera and get pictures of the stage I am in now on “The Bean House”.


No comments:
Post a Comment